Java基础之Spring MVC框架
简介
SpringMVC 是一种基于 Java 的实现 MVC 设计模型的请求驱动类型的轻量级 Web 框架
Hello, World!
创建Maven工程
导入依赖
- Spring MVC核心依赖
- Web相关依赖(比如后续开发需要的json处理依赖、验证码组件依赖等等)
在Maven中的pom.xml添加即可
1
2
3
4
5
6
7
8
9
10
11
12
13
14
15
16
17
18
19
20
21
22
23
24
25
26
27
28
29<dependencies>
<!-- 1.spring mvc核心依赖 -->
<dependency>
<groupId>org.springframework</groupId>
<artifactId>spring-webmvc</artifactId>
<version>5.3.1</version>
</dependency>
<!-- 2.web相关依赖 -->
<dependency>
<!-- jstl支持 -->
<groupId>javax.servlet</groupId>
<artifactId>jstl</artifactId>
<version>1.2</version>
</dependency>
<dependency>
<!-- servlet编译环境 -->
<groupId>javax.servlet</groupId>
<artifactId>javax.servlet-api</artifactId>
<version>4.0.1</version>
<scope>provided</scope>
</dependency>
<dependency>
<!-- jsp编译环境 -->
<groupId>javax.servlet</groupId>
<artifactId>jsp-api</artifactId>
<version>2.0</version>
<scope>provided</scope>
</dependency>
</dependencies>web应用配置
war包配置
在pom.xml的project标签中配置
1
2
3
4
5<groupId>org.example</groupId>
<artifactId>springmvc-learn</artifactId>
<version>1.0-SNAPSHOT</version>
<!-- war包配置 -->
<packaging>war</packaging>创建Web目录

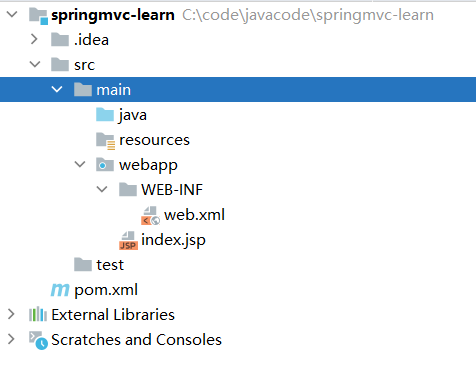
webapp目录就是我们的web目录,里面存放动态、静态资源和配置文件,如jsp文件、js文件、css文件、HTML文件等
WEB-INF目录下只有一个文件,就是web配置文件:web.xml
若无web.xml,则需要创建web.xml
前端控制器(配置web.xml)
注册SpringMVC的前端控制器DispatcherServlet
1
2
3
4
前端控制器的作用:
1. 前端、负责接收所有请求
2. 加载mvc.xml,启动Spring MVC
3. Spring MVC流程调度默认配置方式:
1
2
3
4
5
6
7
8
9
10
11
12
13
14
<!-- 配置SpringMVC的前端控制器,对浏览器发送的请求统一进行处理 -->
<servlet>
<servlet-name>springMVC</servlet-name>
<servlet-class>org.springframework.web.servlet.DispatcherServlet</servlet-class>
</servlet>
<servlet-mapping>
<servlet-name>springMVC</servlet-name>
<!--
设置springMVC的核心控制器所能处理的请求的请求路径
/所匹配的请求可以是/login或.html或.js或.css方式的请求路径
但是/不能匹配.jsp请求路径的请求
-->
<url-pattern>/</url-pattern>
</servlet-mapping>扩展配置方式(推荐):
可通过
init-param标签设置SpringMVC配置文件的位置和名称,通过load-on-startup标签设置SpringMVC前端控制器DispatcherServlet的初始化时间1
2
3
4
5
6
7
8
9
10
11
12
13
14
15
16
17
18
19
20
21
22
23
24
25
26
27
28
29
30
31
32
33
34
<web-app xmlns="http://xmlns.jcp.org/xml/ns/javaee"
xmlns:xsi="http://www.w3.org/2001/XMLSchema-instance"
xsi:schemaLocation="http://xmlns.jcp.org/xml/ns/javaee http://xmlns.jcp.org/xml/ns/javaee/web-app_4_0.xsd"
version="4.0">
<!-- 配置SpringMVC的前端控制器,对浏览器发送的请求统一进行处理 -->
<servlet>
<servlet-name>springMVC</servlet-name>
<servlet-class>org.springframework.web.servlet.DispatcherServlet</servlet-class>
<!-- 通过初始化参数指定SpringMVC配置文件的位置和名称 -->
<init-param>
<!-- contextConfigLocation为固定值 -->
<param-name>contextConfigLocation</param-name>
<!-- 使用classpath:表示从类路径查找配置文件,例如maven工程中的src/main/resources -->
<param-value>classpath:springMVC.xml</param-value>
</init-param>
<!--
作为框架的核心组件,在启动过程中有大量的初始化操作要做
而这些操作放在第一次请求时才执行会严重影响访问速度
因此需要通过此标签将启动控制DispatcherServlet的初始化时间提前到服务器启动时
-->
<load-on-startup>1</load-on-startup>
</servlet>
<servlet-mapping>
<servlet-name>springMVC</servlet-name>
<!--
设置springMVC的核心控制器所能处理的请求的请求路径
/所匹配的请求可以是/login或.html或.js或.css方式的请求路径
但是/不能匹配.jsp请求路径的请求
-->
<url-pattern>/</url-pattern>
</servlet-mapping>
</web-app>后端控制器
创建后端控制器
在java目录下创建包:com.learn.web,在包中创建控制器类(普通POJO类):HelloController.java
配置后端控制器:HelloController.java
1
2
3
4
5
6
7
8
9
10
11
12
13
14
15
16
17
18
19
20
21
22
23
24
25
package com.learn.web;
import org.springframework.stereotype.Controller;
import org.springframework.web.bind.annotation.RequestMapping;
//声明控制器
//主路径,此类的所有方法对应的路径都以此开头
public class HelloController {
//从路径 即/home/login
public String login() {
System.out.println("执行登录方法");
return "login";
}
// 从路径 即/home/register
public String register() {
System.out.println("执行注册方法");
return "register";
}
}这就是一个后端控制器
- 此时该控制器没有作用,没有配置注解相关信息,在后续SpringMVC的配置文件中配置
- return语句会跳到相应的页面
在webapp目录创建两个文件:login.jsp和register.jsp
login.jsp:
1
2
3
4
5
6
7
8
9
<%@ page contentType="text/html;charset=UTF-8" language="java" %>
<html>
<head>
<title>Login</title>
</head>
<body>
登录界面
</body>
</html>register.jsp:
1
2
3
4
5
6
7
8
9
<%@ page contentType="text/html;charset=UTF-8" language="java" %>
<html>
<head>
<title>Register</title>
</head>
<body>
注册界面
</body>
</html>Spring MVC配置文件
mvc.xml是Spring MVC项目的配置文件,我们要先创建mvc.xml,然后在里面配置我们的注解扫描、注解驱动、视图解析器等配置信息
1
2
3
4
5
6
7
8
9
10
11
12
13
14
15
16
17
18
19
20
21
22
23
24
25
26<beans xmlns="http://www.springframework.org/schema/beans"
xmlns:context="http://www.springframework.org/schema/context"
xmlns:mvc="http://www.springframework.org/schema/mvc"
xmlns:xsi="http://www.w3.org/2001/XMLSchema-instance"
xsi:schemaLocation="http://www.springframework.org/schema/beans
http://www.springframework.org/schema/beans/spring-beans.xsd
http://www.springframework.org/schema/context
http://www.springframework.org/schema/context/spring-context.xsd
http://www.springframework.org/schema/mvc
http://www.springframework.org/schema/mvc/spring-mvc.xsd">
<!--注解扫描-->
<context:component-scan base-package="com.learn.web"/>
<!--注解驱动-->
<mvc:annotation-driven></mvc:annotation-driven>
<!--视图解析器-->
<bean class="org.springframework.web.servlet.view.InternalResourceViewResolver">
<!--前缀-->
<property name="prefix" value="/"></property>
<!--后缀-->
<property name="suffix" value=".jsp"></property>
</bean>
</beans>注册mvc.xml
写好Spring MVC配置文件后,还需去加载它。前端控制器有一个作用就是加载mvc.xml配置文件,启动Spring MVC工厂
修改web.xml中的如下内容
1
2
3
4
5
6
7
<!-- 通过初始化参数指定SpringMVC配置文件的位置和名称 -->
<init-param>
<!-- contextConfigLocation为固定值 -->
<param-name>contextConfigLocation</param-name>
<!-- 使用classpath:表示从类路径查找配置文件,例如maven工程中的src/main/resources -->
<param-value>classpath:mvc.xml</param-value>
</init-param>配置Tomcat,测试
参考:Spring MVC——项目的开发流程 - 城北有个混子 - 博客园 (cnblogs.com)
@RequestMapping注解
属性:
1 | 1. path 指定请求路径的url |
value
1 |
|
设置请求方法(method)
1 |
|
设置请求参数(params)
1 | "param":要求请求映射所匹配的请求必须携带param请求参数 |
1 |
|
参数绑定:
1 |
|
参数可绑定实体类,需要构建一个含有username和password的实体类,传入的参数是实体类参数即可
1 |
|
请求头
1 | "header":要求请求映射所匹配的请求必须携带header请求头信息 |
参考:Java学习之Spring MVC入门 - nice_0e3 - 博客园 (cnblogs.com)
常用注解
@RequestParam
三个属性:
value:指定为形参赋值的请求参数的参数名required:设置是否必须传输此请求参数,默认值为true值为
true时,则当前请求必须传输value所指定的参数名,若没有传输该请求参数,且没有设置defaultValue属性,则页面报错1
400:Required String parameter 'xxx' is not present;
值为
false,则当前请求不是必须传输value所指定的请求参数。若没有传,则注解所标识的形参的值为null
defaultValue:不管required属性值为true或false,当value所指定的请求参数没有传输或传输的值为空""时,则使用默认值为形参赋值
例:
1 | // RequestParam注解 |
@PathVariable
1 |
|
@RequestBody
1 |
|
用于获取post请求的请求体内容
@RequestHeader
共有三个属性:value、required、defaultValue,用法同@RequestParam
1 |
|
@CookieValue
1 |
|
用于获取指定cookie的名称的值
参考Spring入门(十三):Spring MVC常用注解讲解 - 掘金 (juejin.cn)
拦截器
概念
拦截器和过滤器类似,但存在区别:
- 过滤器在任何框架都可以使用,而拦截器是Spring MVC独有的
- 过滤器配置/ * 拦截所有资源,所有静态资源都会被拦截,而拦截器只会拦截控制器的方法
自定义拦截器
自定义拦截器必须实现HandlerInterceptor接口
1 | 1. preHandle方法是controller方法执行前拦截的方法 |
preHandle方法
重写HandlerInterceptor接口中的preHandler方法,会在执行控制器方法之前执行该方法
1 | package com.learn.web; |
把自定义拦截器加入到spring mvc.xml的配置文件中
1 | <!-- 拦截器 --> |
postHandle方法
1 |
|
在控制器方法执行之后执行
afterCompletion方法
1 |
|
在jsp执行之后执行
配置多个拦截器
只需要在spring mvc的配置文件中添加<mvc:interceptor>
参考:Java学习之SpringMVC 拦截器 - nice_0e3 - 博客园 (cnblogs.com)
Spring MVC Model向View传递值
控制器方法
1 |
|
login.jsp:
1 | <%@ page contentType="text/html;charset=UTF-8" language="java" %> |
参考
Spring MVC——项目的开发流程 - 城北有个混子 - 博客园 (cnblogs.com)