概述 Spring缺点:
SpringBoot功能
自动配置
起步依赖
辅助功能
SpringBoot不是对Spring功能上的增强,而是提供了一种快速使用Spring的方式
简单例子 简单搭建一个springboot-hello工程,步骤如下:
创建Maven项目
导入SpringBoot起步依赖
定义Controller
编写引导类
启动测试
按照上面的步骤创建Maven工程,在pom.xml中添加相关依赖
1 2 3 4 5 6 <parent > <groupId > org.springframework.boot</groupId > <artifactId > spring-boot-starter-parent</artifactId > <version > 2.3.5.RELEASE</version > </parent >
1 2 3 4 5 6 7 <dependencies > <dependency > <groupId > org.springframework.boot</groupId > <artifactId > spring-boot-starter-web</artifactId > </dependency > </dependencies >
创建HelloController
1
2
3
4
5
6
7
8
9
10
11
12
13
package org.example.Controller;import org.springframework.web.bind.annotation.RequestMapping;import org.springframework.web.bind.annotation.RestController;@RestController public class HelloController { @RequestMapping("/hello") public String hello () { return "Hello, SpringBoot!" ; } }
创建启动类HelloApplication(启动类一般以Application结尾)
1
2
3
4
5
6
7
8
9
10
11
package org.example;import org.springframework.boot.SpringApplication;import org.springframework.boot.autoconfigure.SpringBootApplication;@SpringBootApplication public class HelloApplication { public static void main (String[] args) { SpringApplication.run(HelloApplication.class, args); } }
由于SpringBoot中内置服务器,查看运行日志找到服务开放的对应端口访问即可http://127.0.0.1:8080/hello即可进行字符的打印 https://docs.spring.io/spring-boot/docs/current/reference/html/getting-started.html
总结:
SpringBoot在创建项目时,使用jar的打包方式
SpringBoot的引导类,是项目入口,运行main方法即可启动项目
使用SpringBoot和Spring构建项目,业务代码编写方式完全一样
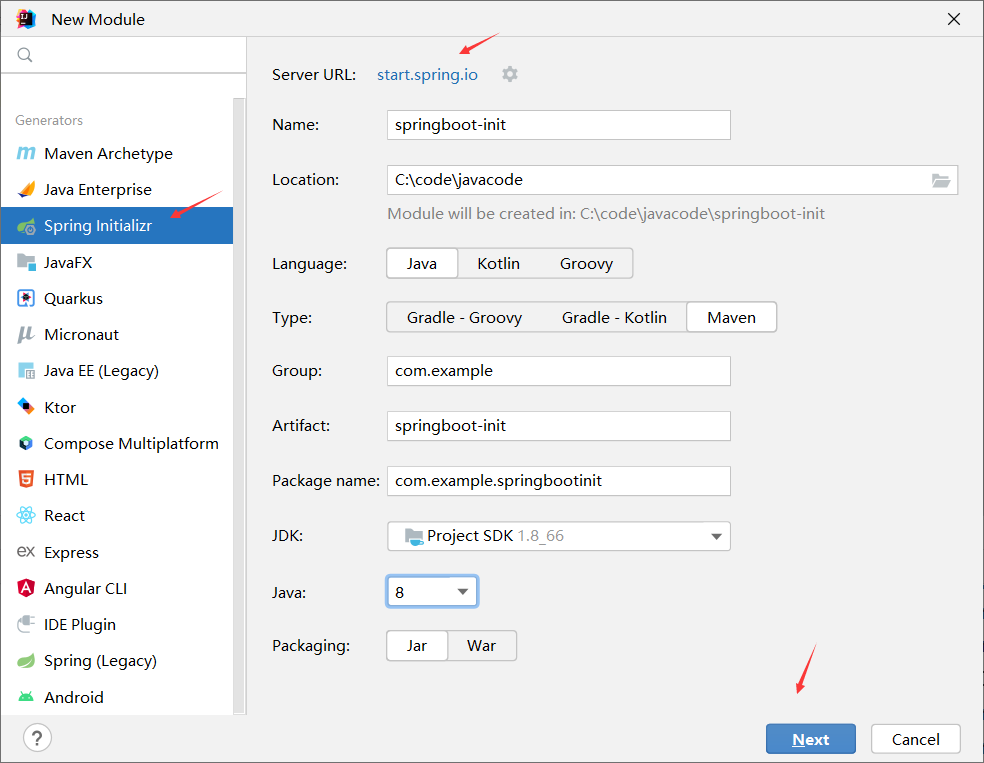
快速构建SpringBoot工程 在IDEA中新建模块
SpringBoot配置 配置文件分类 :
默认配置文件名称:application
YAML基本语法 :
大小写敏感
数据值前面必须有空格作为分隔符
使用缩进表示层级关系
缩进时不允许使用Tab键,只允许使用空格
缩进的空格数目不重要,只要相同层级的元素左侧对其即可
#表示注释,从这一个字符一直到行尾,都会被解析器所忽略
1 2 3 4 5 server: port: 8080 address: 127.0 .0 .1 name: abc
YAML数据格式 :
对象(map):键值对的集合
1 2 3 4 person: name: zhansan person: {name: zhansan }
数组:一组按次序排列的值
1 2 3 4 5 address: - beijing - shanghai address: [beijing ,shanghai ]
纯量:单个的、不可再分的值
1 2 msg1: 'hello \n world' msg2: "hello \n world"
YAML参数引用 :
1 2 3 4 name: lisi person: name: ${name}
获取配置数据 :
@Value
Environment
@ConfigurationProperties
a. @Value取值
1 2 3 4 5 name: zhangshan Person: username: lisi age: 18
HelloController中代码如下:
1 2 3 4 5 6 7 8 9 10 11 12 13 14 15 16 17 18 19 20 21 22 23 24 25 26 package com.example.springbootinit;import org.springframework.beans.factory.annotation.Value;import org.springframework.web.bind.annotation.RequestMapping;import org.springframework.web.bind.annotation.RestController;@RestController public class HelloController { @Value("${name}") private String name; @Value("${Person.username}") private String username; @Value("${Person.age}") private int age; @RequestMapping("/hello1") public String hello1 () { System.out.println("name:" + name); System.out.println("username:" + username); System.out.println("age:" + age); return "hello, springboot!" ; } }
这样就能成功取到application.yml中的值了
b. Environment
1 2 3 4 5 6 7 8 9 10 11 12 13 14 15 16 17 18 19 20 package com.example.springbootinit;import org.springframework.beans.factory.annotation.Autowired;import org.springframework.core.env.Environment;import org.springframework.web.bind.annotation.RequestMapping;import org.springframework.web.bind.annotation.RestController;@RestController public class HelloController { @Autowired private Environment env; @RequestMapping("/hello2") public String hello2 () { System.out.println("name" + env.getProperty("name" )); System.out.println("age" + env.getProperty("Person.age" )); return "Hello SpringBoot!" ; } }
c. @ConfigurationProperties
1 2 3 4 5 6 7 8 9 10 11 12 13 14 15 16 17 18 19 20 21 22 23 24 25 26 27 28 29 30 31 32 33 34 35 36 package com.example.springbootinit;import org.springframework.boot.context.properties.ConfigurationProperties;import org.springframework.stereotype.Component;@Component @ConfigurationProperties(prefix = "person") public class Person { private String username; private int age; public String getUsername () { return username; } public void setUsername (String username) { this .username = username; } public int getAge () { return age; } public void setAge (int age) { this .age = age; } @Override public String toString () { return "Person{" + "username='" + username + '\'' + ", age=" + age + '}' ; } }
HelloController中的代码如下:
1 2 3 4 5 6 7 8 9 10 11 12 13 14 15 16 package com.example.springbootinit;import org.springframework.beans.factory.annotation.Autowired;import org.springframework.web.bind.annotation.RequestMapping;import org.springframework.web.bind.annotation.RestController;@RestController public class HelloController { @Autowired private Person person; @RequestMapping("/hello3") public String hello3 () { System.out.println(person); return "hello, SpringBoot" ; } }
另外在Person类中的上方有一个红色条提示,可以根据提示打开文档https://docs.spring.io/spring-boot/docs/2.3.5.RELEASE/reference/html/appendix-configuration-metadata.html#configuration-metadata-annotation-processor
1 2 3 4 5 <dependency > <groupId > org.springframework.boot</groupId > <artifactId > spring-boot-configuration-processor</artifactId > <optional > true</optional > </dependency >
profile配置方式 :
a. 多profile文件方式
1 spring.profiles.active=pro
这表示的是激活application-pro.properties配置文件,即使用该文件的配置
b. yml多文档方式---来分隔配置
1 2 3 4 5 6 7 8 9 10 11 12 13 14 15 16 17 18 19 20 21 22 --- server: port: 8081 spring: profiles: dev --- server: port: 8082 spring: profiles: pro --- server: port: 8082 spring: profiles: test --- spring: profiles: active: pro
profile激活方式 :
配置文件
虚拟机参数
命令行参数
内部配置加载顺序 :
./config/:当前项目下的/config目录下
./:当前项目的根目录
classpath: /config/ classpath的/config目录
classpath: / classpath的根目录
外部配置文件加载顺序 :https://docs.spring.io/spring-boot/docs/current/reference/html/features.html#features.external-config


